Setting Up Voicemail
A popular and important use case is recording a voicemail from your callers when you are unable to speak with them. This guide will show how to do exactly that.
In this guide we will see how to implement a voicemail using Node.js. This allows you the most flexibility in case you want to integrate voicemails with complex workflows.
Assigning a Phone Number to a Relay Topic
To handle calls using Node.js, you should first set up a phone number to handle incoming calls using a Relay application.
Click the Phone Numbers tab on your lefthand side nav within your SignalWire Space, and click the specific number you would like to set up call forwarding on. If you don't have a number yet, now is the time to buy one!
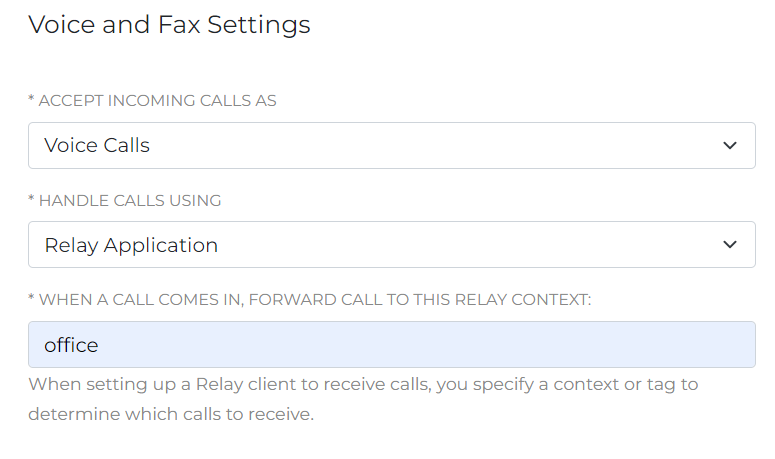
To configure your number to handle incoming calls with a Relay application, set 'Handle calls using' to 'Relay Application', then specify the name of a topic (here we choose 'office').
Building the application
Our phone number is now configured. Let's see how to build the voicemail with Node.js.
Installation
First, you need to obtain the Realtime SDK. From your terminal you can run:
- npm
- Yarn
- pnpm
npm install --save @signalwire/realtime-api
yarn add @signalwire/realtime-api
pnpm add @signalwire/realtime-api
This will install the Realtime SDK from npm into your project.
Code
The first thing we need to do is to import the Realtime SDK and initialize a Voice client. We can do it like this:
import { SignalWire } from "@signalwire/realtime-api";

const client = await SignalWire({
  project: "<project-id>",
  token: "<api-token>",
  topics: ["office"],
});

const voiceClient = client.voice;
We want to execute our logic whenever a call is received. Let's attach an
event handler to the call.received event, from which we can answer the call
and play a message:
await voiceClient.listen({
  topics: ["office"],
  onCallReceived: async (call) => {
    console.log("Got call", call.from, call.to);

    await call.answer();

    await call.playTTS({
      text: "Please leave a message with your name and number at the beep. Press the pound key when finished.",
    });
  },
});
Right after playing the introduction message, we need to start recording. In Relay V4, we can set up event listeners directly in the recording call:
// inside the "call.received" event handler

await call
  .recordAudio({
    listen: {
      onEnded: async (rec) => {
        console.log("Recording URL:", rec.url);
        await call.playTTS({
          text: "Thank you for your message. A member of our team will contact you shortly. Goodbye!",
        });
        await call.hangup();
      },
    },
  })
  .onStarted();
We can finally start the recording. Since we also want the recording to be no more than 15 seconds long, we will set a timeout which will stop it if it didn't already end.
await call
  .recordAudio({
    endSilenceTimeout: 0,
    terminators: "#",
    listen: {
      onStarted: async (recording) => {
        // Stop the recording after 15 seconds.
        setTimeout(() => recording.stop(), 15000);
      },
    },
  })
  .onStarted();
Putting all of the parts together, here is the full code:
index.js
import { SignalWire } from "@signalwire/realtime-api";

const client = await SignalWire({
  project: "<project-id>",
  token: "<api-token>",
  topics: ["office"],
});

const voiceClient = client.voice;

await voiceClient.listen({
  topics: ["office"],
  onCallReceived: async (call) => {
    console.log("Got call", call.from, call.to);

    await call.answer();

    await call.playTTS({
      text: "Please leave a message with your name and number at the beep. Press the pound key when finished.",
    });

    await call
      .recordAudio({
        endSilenceTimeout: 0,
        terminators: "#",
        beep: true,
        listen: {
          onStarted: async (recording) => {
            setTimeout(() => recording.stop(), 15000);
          },
          onEnded: async (rec) => {
            console.log("Recording URL:", rec.url);
            await call.playTTS({
              text: "Thank you for your message. A member of our team will contact you shortly. Goodbye!",
            });
            await call.hangup();
          },
        },
      })
      .onStarted();
  },
});

console.log("Started.");
Wrapping up
The Realtime SDK allows you to build powerful applications with a simple API. You are not limited to phone calls: you can also control messaging, chat, video, and more. See all available options in the Realtime SDK documentation.